구글이 만든 MediaPipe는 모바일과 웹에서 실시간으로 돌아가도록 설계된 경량 머신러닝 도구 모음입니다. 그중 Face Detection은 얼굴 검출에 특화된 모델로, BlazeFace라는 매우 빠른 신경망을 써서 웹캠 영상에서도 부드럽게 동작합니다. 이 장에서는 MediaPipe의 두 가지 사용법을 살펴보고, 지금 권장되는 방식으로 실시간 검출을 구현합니다.
MediaPipe의 두 가지 API
MediaPipe Python에는 역사적 이유로 두 갈래의 사용법이 있습니다. 처음 입문할 때 이 둘을 헷갈리면 "예제대로 했는데 안 된다"는 혼란에 빠지기 쉬우니 먼저 정리합니다.
| 방식 | 진입점 | 모델 파일 | 상태 |
|---|---|---|---|
| 레거시 Solutions | mp.solutions.face_detection |
내장(자동) | 지원 종료, 최신 버전에서 제거됨 |
| Tasks API | mediapipe.tasks.python.vision.FaceDetector |
.tflite 직접 지정 |
현재 권장 방식 |
오래된 블로그 글은 대부분 레거시 Solutions 방식을 씁니다. 간단해서 따라 하기 쉬워 보이지만, 여기에는 함정이 있습니다. 구글은 2023년 3월 레거시 Solutions의 지원을 공식 종료했고, 그 뒤로 새 기능은 모두 Tasks API에 모으고 있습니다. 더 중요한 사실이 있습니다. 최신 mediapipe(예: 0.10.31)에는 mp.solutions 모듈 자체가 빠져 있습니다. 0.10.21까지는 들어 있었지만, 지금 새로 pip install mediapipe로 설치하면 최신 버전이 깔리므로 레거시 예제가 ModuleNotFoundError: mediapipe.solutions로 곧장 실패합니다.
그래서 이 책은 처음부터 Tasks API를 중심으로 설명합니다. 오래된 블로그 코드를 꼭 돌려 봐야 한다면 pip install "mediapipe==0.10.21"처럼 옛 버전을 못 박아야 하는데, 이러면 numpy 등 다른 라이브러리 버전까지 옛것으로 끌려가 충돌이 생기기 쉽습니다. 새 코드는 Tasks API로 작성하는 것이 정답입니다.
파이썬 버전 주의. MediaPipe는 현재 파이썬 3.8~3.12를 지원하며, 3.13용 휠은 아직 제공되지 않습니다(소스 빌드도 실패). PART 01에서 실습 환경을 파이썬 3.11로 고정한 이유가 여기에 있습니다. 가장 최신 파이썬을 쓰면 MediaPipe가 아예 설치되지 않을 수 있습니다.
Tasks API로 검출하기
Tasks API는 모델 파일(.tflite)을 직접 지정합니다. 얼굴 검출용 경량 모델인 blaze_face_short_range.tflite를 MediaPipe 모델 페이지에서 내려받아 작업 폴더에 둡니다. 다음 내용을 mp_detect.py로 저장합니다.
# 파일: mp_detect.py"""MediaPipe Tasks API로 정지 이미지에서 얼굴을 검출한다."""import cv2import mediapipe as mpfrom mediapipe.tasks import pythonfrom mediapipe.tasks.python import vision# 검출기 옵션: 내려받은 tflite 모델 경로를 지정한다base_options = python.BaseOptions(model_asset_path="blaze_face_short_range.tflite")options = vision.FaceDetectorOptions(base_options=base_options)detector = vision.FaceDetector.create_from_options(options)# MediaPipe는 자체 Image 객체를 입력으로 받는다mp_image = mp.Image.create_from_file("sample.jpg")result = detector.detect(mp_image)img = cv2.imread("sample.jpg")for detection in result.detections: box = detection.bounding_box # origin_x, origin_y, width, height x, y = box.origin_x, box.origin_y cv2.rectangle(img, (x, y), (x + box.width, y + box.height), (0, 255, 0), 2) score = detection.categories[0].score cv2.putText(img, f"{score:.2f}", (x, y - 6), cv2.FONT_HERSHEY_SIMPLEX, 0.5, (0, 255, 0), 1, cv2.LINE_AA)cv2.imwrite("mp_result.jpg", img)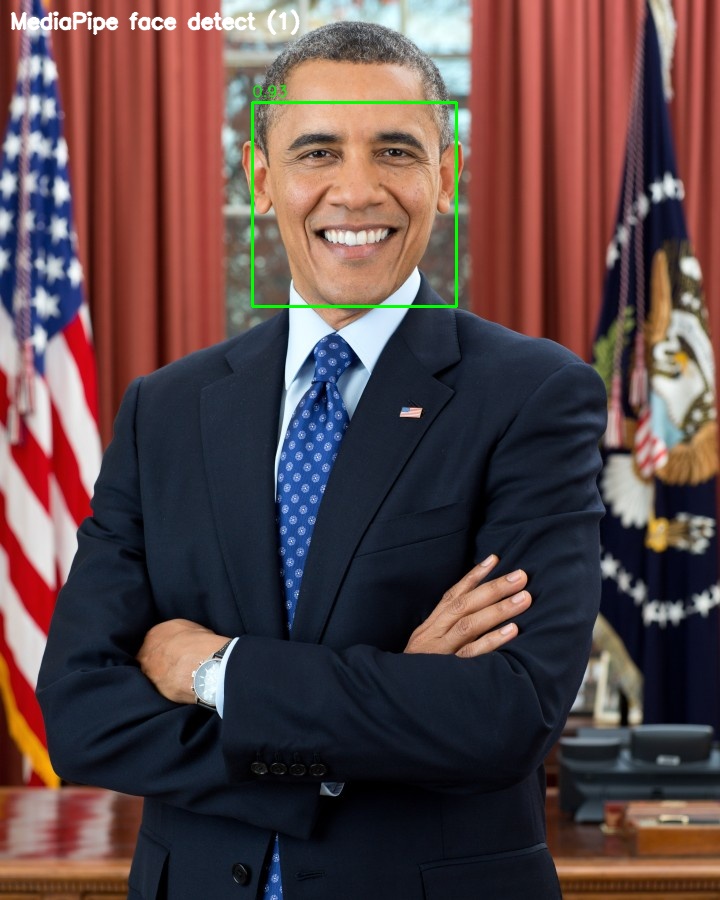
Tasks API의 결과는 result.detections 목록이고, 각 검출의 bounding_box는 픽셀 단위의 origin_x, origin_y, width, height를 직접 제공합니다. 신뢰도는 categories[0].score에 들어 있습니다. 비율 좌표를 픽셀로 환산할 필요가 없어 SSD보다 다루기 편합니다.
실시간 웹캠 검출
MediaPipe의 진가는 영상에서 드러납니다. 웹캠 프레임을 받아 실시간으로 검출하는 코드입니다.
# 파일: mp_webcam.py"""MediaPipe Tasks API로 웹캠에서 실시간 얼굴 검출. q 키로 종료."""import cv2import mediapipe as mpfrom mediapipe.tasks import pythonfrom mediapipe.tasks.python import visionbase_options = python.BaseOptions(model_asset_path="blaze_face_short_range.tflite")options = vision.FaceDetectorOptions(base_options=base_options)detector = vision.FaceDetector.create_from_options(options)cap = cv2.VideoCapture(0)while True: ok, frame = cap.read() if not ok: break # OpenCV BGR 프레임을 MediaPipe Image(RGB)로 감싼다 rgb = cv2.cvtColor(frame, cv2.COLOR_BGR2RGB) mp_image = mp.Image(image_format=mp.ImageFormat.SRGB, data=rgb) result = detector.detect(mp_image) for detection in result.detections: box = detection.bounding_box x, y = box.origin_x, box.origin_y cv2.rectangle(frame, (x, y), (x + box.width, y + box.height), (0, 255, 0), 2) cv2.imshow("MediaPipe - press q to quit", frame) if cv2.waitKey(1) & 0xFF == ord("q"): breakcap.release()cv2.destroyAllWindows()위 코드는 매 프레임을 독립된 사진처럼 다루는 기본(IMAGE) 모드로 검출합니다. 짧은 예제에는 충분하지만, MediaPipe는 영상 스트림을 위한 VIDEO 모드도 제공합니다. FaceDetectorOptions에 running_mode=vision.RunningMode.VIDEO를 주고 detector.detect_for_video(mp_image, timestamp_ms)로 호출하면, 프레임 사이의 시간 정보를 활용해 영상에 더 적합하게 동작합니다. 이때 timestamp_ms는 프레임마다 증가하는 밀리초 단위 시각을 넘겨야 합니다. 본격적인 실시간 서비스를 만들 때는 VIDEO 모드 사용을 권합니다.
레거시 Solutions 방식 (참고 — 최신 버전에서는 동작하지 않음)
옛 예제에서 흔히 보는 레거시 방식은 모델 파일을 따로 지정하지 않아 코드가 더 짧습니다. 다만 앞서 말했듯 최신 mediapipe에는 mp.solutions가 없으므로, 아래 코드는 옛 버전(mediapipe==0.10.21 이하)을 설치했을 때만 동작합니다. 어떤 모습인지 참고로만 보고, 새 코드에는 반드시 위의 Tasks API를 쓰세요.
# 파일: mp_legacy.py (참고용 — mediapipe<=0.10.21 에서만 동작)import cv2import mediapipe as mpmp_fd = mp.solutions.face_detection # 최신 버전에는 이 모듈이 없음img = cv2.imread("sample.jpg")rgb = cv2.cvtColor(img, cv2.COLOR_BGR2RGB)with mp_fd.FaceDetection(model_selection=0, min_detection_confidence=0.5) as fd: results = fd.process(rgb) # results.detections의 좌표는 0~1 상대값이라 이미지 크기를 곱해야 한다실무 팁. MediaPipe Face Detection은 신원 인식 기능이 없습니다. PART 00의 지형도에서 짚었듯, MediaPipe는 검출과 표정(블렌드셰이프)에 강하지만 "이 사람이 누구인가"는 답하지 못합니다. 실시간으로 얼굴 위치만 빠르게 잡아야 하는 상황, 예컨대 화상회의 효과나 모자이크 처리에 특히 잘 맞습니다.
이 장에서 기억할 것
MediaPipe Face Detection은 BlazeFace 기반의 경량 검출기로 실시간 영상에 강합니다. 두 가지 API가 공존하는데, 현재 권장되는 Tasks API는 .tflite 모델을 지정해 FaceDetector.create_from_options로 만들고, 결과의 bounding_box가 픽셀 좌표를 바로 줘 다루기 편합니다. 레거시 Solutions 방식은 더 간단하지만 지원이 종료되어 최신 mediapipe에는 mp.solutions가 아예 빠져 있으므로, 새 코드는 Tasks API로 작성해야 합니다. 또한 MediaPipe는 파이썬 3.12까지만 지원하니 실습 환경의 파이썬 버전(3.11)을 그대로 유지하세요. 다음 장에서는 속도 대신 정확도를 끌어올린 고정밀 검출기 RetinaFace와 MTCNN을 만납니다.